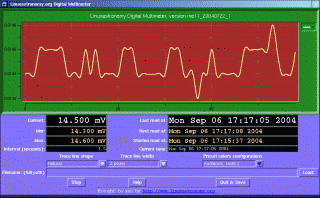
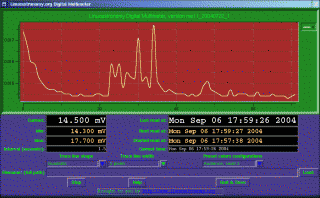
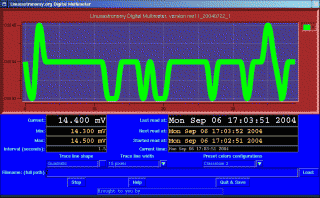
Description of a digital multimeter application.
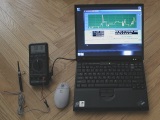
A project to connect a digital multimeter with a computer.
|
|
|
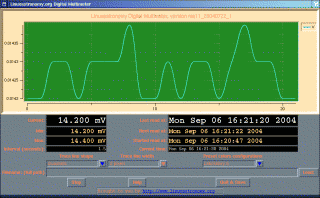
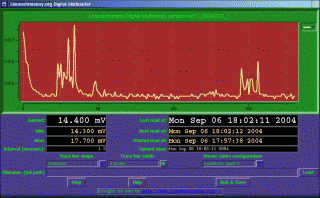
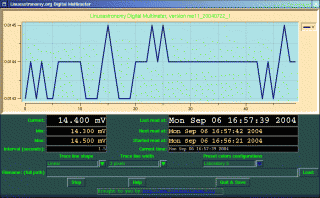
It is a simple application that started by helping a few adults and younger one to learn some basic programming skills. It could have probably be writen in less lines of code, meanwhile, we had for goal a good simple teaching experience. The program started in TCL/TK programing script language, later we switched to the Python programming script language. As this is a versatil program, the user interface was also designed with some polyvalence. When ever the unit of measure are changed on the meter, the new unit is set automatically on the program. The colors of the screen background, trace line, etc, can be adjusted to accomodate to many situations. To measure parameters on a telescope by night (voltage, amps, resistance, temperature, etc.), a dark screen with as little light as possible is desired, almost everything should be in red tint or black. The colors blinds should also be able to adjust it to their convenience. Same for a presentation, trace line thickness can be adjusted, so people a little further away can still see it. The shape of the line itself can be adjusted. At time of this writing, they are 4 possible choices. "Step", "quadratic", "natural" and "linear". To see a trace line relevant to a work situation, the different shapes can be selected form the pull down menu. It can be done anytime, while the reading are in process (provided they are already a few reading displayed on the screen). It does not affect the value of the reading itself, just the display of it. Data previously recorded can be reloaded to be displayed on the screen. It is also possible to do some reading while reloading older data, but at time of this writing it is still more a side effect of the program than a real feature. Users feedback are greatly apreciated, with a picture(s) if any, of how the application is used. Please, let us know if you made the program better, added some features, etc. |
|
Some required dependant applications:
|
Extensions required to run pyDmm: "BLT", It is a toolkit of little applications called "widgets". "BLT" is an extension of the TK tolkit. It should be installed before "Pmw". Info and download of "BLT": BLT (SourceForge, info and download) BLT (project on SourceForge and download link) "BLT" may be included with some linux distributions. "Pmw" which stand for "Python Mega Widget". "Pmw" is a toolkit of little applications called "widgets". "Pydmm", use "Pmw" to display data graphically on the screen. Example of Pmw installation. It can vary from one distribution to another. Please, check the Pmw website for exact instructions. Assuming you have downloaded Pmw in the /tmp directory: cd /usr/lib/python2.3/site-packages Install as "root". These folders seems to be the correct folders for SuSE 9.x Depending on your system it can be: cd /usr/lib/python2.2/site-packages These folders seems to be the correct folders for SuSE 8.x Uncompress Pmw: gunzip /tmp/Pmw.1.2.tar.gz tar -xvf /tmp/Pmw.1.2.tar Always look on the Pmw website for the correct information ! Info and download of "Pmw": Pmw (SourceForge) Pmw (Freshmeat) "pySerial" is a toolkit that encapsulate data going through the serial port. Example of pySerial installation: Download pySerial in a temporary directory Uncompress pyserial: unzip pyserial-2.1.zip Then from the temporary directory used for download, as "root" run the command: python setup.py install If it can not find it, simply change folder to the new created pyserial folder: cd pyserial-2.1 (or what ever version number you have downloaded). You should be done. Always look on the pySerial website for the correct information ! Info and download of "pySerial": pySerial (SourceForge) |
 ... |
|
The full information available for the extension is available online, same for python. Check the links provided in the previous section (Extensions required to run pyDmm). As of now (2005/03), to run Pydmm, Python version 1.5, 2.1 or 2.2 is required. Python is currently available with almost any distributions, but it may not be installed by default. If python is not installed, a python package is probably included on a distribution CD. The latest version of Python can also be downloaded from : http://python.org To find out if Python is installed, type the following in an xterm (as a user, no need to be root) : which python Press Enter (or return). The computer should return something like: "/usr/bin/python" To find out which version of Python is installed, type the following in an xterm : python -v. Press Enter (or return). If Python is installed but does not seems to run, Perhaps the environment variable need to be set. try the following command: set PYTHONPATH Press Enter (or return). If python need to be installed. start by checking if a package already exist for the distribution used on the computer. Use "yast" with SuSE, "RPM" with RedHat, "ap-get" with Debian. Now, download the pyDmm program. You should get a file ending with ".tgz" Type: tar -xvzf pyDmmxxxx.tgz Press Enter (or return). (replace "xxxx" by the correct version number). In case of dificulty, or if the file end in ".tar.gz", try: gunzip pyDmmxxxx.tar.gz Press Enter (or return). Wich should result with a file that have a ".tar" extension, such as "pyDmmxxxx.tar". Then: tar -xvf pyDmmxxxx.tar Press Enter (or return). (replace "xxxx" by the correct version number). |
|
How to run sucessfully the program, step by step:
|
- Connect the digital meter to the computer, using a serial cable. - Plug in a temperature probe (or what ever need to be connected) into the meter. - Connect a temperature probe, or the meter wire to what ever you wish to take measures. - Connect the serial cable to the meter. - Connect the serial cable to the computer. - Provide power to the meter. - Tunr On your computer and let it boot. - Log in. - In an "Xterm", type: cd /home/foo/dmm Replace the previous path by one that apply on the computer being used. (example, "foo" can be replaced by the user login name on the computer). Once in the meter application folder, type the command which allow to run the meter with data loging. In this example the meter to be used is a "Metex Me-11" or one of the compatible: ./me11.sh 600 Or ./me11.sh 1200 In this example the meter to be used is a "Mastech M 9803 R" or one of the compatible: ./m9803r.sh 9600 The "me11.sh" or "m9803r.sh" are configuration files. To modify the settings, simply change the preset parameters. |
|
||||||||||||||||||
|
|||||||||||||||||||
|
If every step as been followed up to here, the program should run. If not... Check everything typed for a typo mistake. Example, do not confuse "'`, they are three diferent characters. Check that the preset parameters apply to your situation, example check the communication port (ttyS0, ttyS1, ...). Check the wiring. Check that every item is powered up, example the meter. Check the cable, you can swap it with another one to test if it work better. Check the communication parameters for YOUR meter ! The transmission speed is usualy "600, 1200 or 9600" bits per second (baud). The others communication parameter are usually 7 or 8 bits, 0, 1, or 2 stop bits. We would appreciate any feedback, with a picture(s) if any, of what you are doing with it. Also, let us know if you modify the program, adde some features, etc. |
 |
||||||||||||||||||
Distributions specific issues:
|
Part of pyDmm development has been done using SuSE linux. the development team is open to any others distributions. Tests are also done on others ditributions, simply less often. Users are welcome to provide pyDmm development team with feedbacks. Distributions specific information: Gentoo. Thank you to Todd for testing pyDmm on Gentoo. Todd let us know: It's very simple to get running on a Gentoo system: 1) Add "tcltk" to your /etc/make.conf USE setting. 2) Run "emerge python blt pmw pyserial" This was tested with a Radio Shack #22-805, purchased sometime in 2000. Mandrake 10.0 and 10.1. Thank you to Todd for doing the extra work fixing some Mandrake issues. Todd even did some RPMs for pyDMM. 1) urpmi Pmw (pulls in blt-scripts, libblt2, Pmw, and any python requirements that might be missing). 2) download the updated python packages for 10.0 or 10.1 3a) for 10.0: urpmi ./tkinter-2.3.3-2.1tal.i586.rpm ./python-2.3.3-2.1tal.i586.rpm ./libpython2.3-2.3.3-2.1tal.i586.rpm ./python-base-2.3.3-2.1tal.i586.rpm 3b) for 10.1: urpmi ./python-2.3.4-6.1tal.i586.rpm ./python-base-2.3.4-6.1tal.i586.rpm ./libpython2.3-2.3.4-6.1tal.i586.rpm ./tkinter-2.3.4-6.1tal.i586.rpm 4) If the user has libpython2.3-devel installed, they will also have to upgrade the libpython2.3-devel package in the above urpmi command. |
|
|
We did the hard work, your job is to install and configure the application on your machine. We are in the process to write a "FAQ" (frequently asked quesitons), with the feedback you will send us. Go to the multimeter application "FAQ". |
|
|
When you select "home", it bring you to the root of the site, "www.linuxastronomy.org" "users", bring you to a list of some volunteers of the main project of this site. Site maintained by Pixo with the help of other nice people. To send us a message. |
| Linux is a registered Trademark of Linus Torvald |
| Copyright © 2002, 2003, 2004, 2005, Eugene Clement |
| Back to top of page. |